Mobile applications have become an integral part of modern businesses, making mobile test automation a critical aspect of ensuring application quality. Sedstart simplifies this process by providing a no-code platform where users can automate Android applications without writing complex Appium scripts.
In this blog, we'll walk through the complete process of setting up Android Mobile Automation in Sedstart using Appium, Ngrok, and Appium Inspector.
Prerequisites
Before starting, ensure the following tools are installed on your machine:
Java JDK 21 or later
Node.js
Appium 3.x
Android Studio
Android SDK
Android Emulator or Physical Android Device
Appium Inspector
Ngrok
Sedstart Local
Verify your Appium driver setup using:
appium driver doctor uiautomator2
Note: the standalone package used in earlier Appium versions is deprecated and no longer reliable on Appium 3.x. Use the driver-specific command instead, as shown above.
appium driver doctor <driver_name>
appium-doctor
All mandatory dependencies should pass successfully before proceeding.
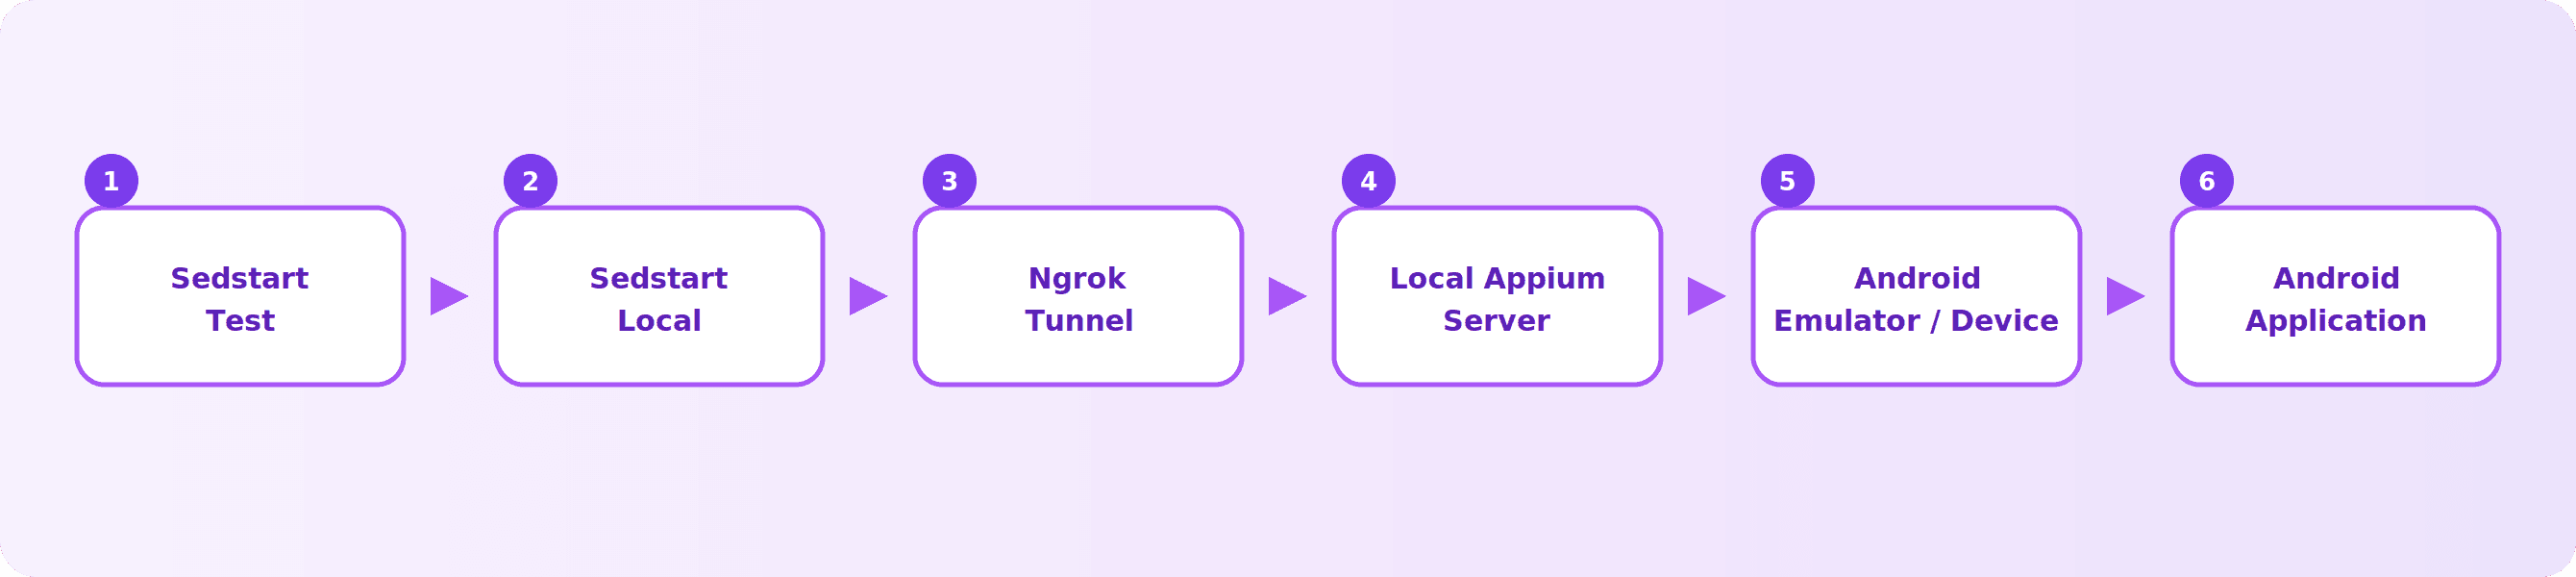
Architecture
The execution flow looks like this:
Step 1: Start the Appium Server
Open a terminal and start Appium:
appium --allow-cors
Or specify the port explicitly:
appium --allow-cors --port 4723
Once started successfully, you'll see:
Appium REST http interface listener started on http://127.0.0.1:4723
Keep this terminal open throughout the execution.
Step 2: Expose Appium Using Ngrok
Since Sedstart communicates with your local machine, expose the Appium server through Ngrok.
Run:
ngrok http 4723
Ngrok generates a public HTTPS URL.
Example:
https://your-ngrok-url.ngrok-free.dev
This URL will be used as the HUB_URL inside Sedstart.
Note: on a free Ngrok plan, this URL is ephemeral — it changes every time you restart the tunnel (including after a machine restart). If a previously working test suddenly can't connect, check whether your Ngrok URL has changed before troubleshooting anything else, and update the value in your Data Profile accordingly.
HUB_URL
Step 3: Launch Android Emulator
Open Android Studio and start your preferred Android Virtual Device (AVD).
Verify that the emulator is connected:
adb devices
Example:
List of devices attached emulator-5554 device
Step 4: Launch Appium Inspector
Open Appium Inspector and configure it with your local Appium server:
Remote Host:
127.0.0.1
Remote Port:
4723
Remote Path:
/
##Step 5: Configure Desired Capabilities
Enter the desired capabilities, adjusting values to match your own emulator or device:
Example:
{
  "platformName": "Android",
  "appium:automationName": "UiAutomator2",
  "appium:deviceName": "Pixel 9",
  "appium:platformVersion": "17",
  "appium:app": "/path/to/your/application.apk"}
Note: Ensure the platformVersion matches the Android version of your emulator or device. If your emulator is running Android 17, use "17" or omit the field. If your emulator is running a different Android version, use that version number, or omit the field to let Appium detect it automatically.
Click Start Session. The application will launch automatically.
Step 6: Inspect Application Elements
Appium Inspector displays the application's UI hierarchy.
Select any UI element and copy its UiAutomator Selector.
Examples:
new UiSelector().resourceId("com.demo:id/login")
or:
new UiSelector().text("Login")
These selectors will be used while creating Android elements inside Sedstart.
Important: Verify against your Sedstart environment before following this step: whether the selector needs to be wrapped in backticks depends on which field you're pasting it into. When copying the raw selector out of Appium Inspector, enter it as plain text with no backticks. When entering it into the locator field on the Android Element object in Step 10 below, Sedstart's editor treats it as a static value and expects it wrapped in backticks. If you hit a parsing error either way, try the selector both with and without backticks in that specific field — this inconsistency between steps is flagged for the Sedstart docs team to confirm and clarify with a definitive rule before this guide is finalized.
Step 7: Create an Appium Server Object in Sedstart
Inside Sedstart, create a new Appium Server object.
Configure its URL using:
profile.HUB_URL
Using a variable instead of a hardcoded URL makes the configuration reusable across environments.
Step 8: Create an Android Device
Create an Android Device object and configure it with the same capabilities used in Appium Inspector.
Typical configuration:
Platform Name:
Android
Automation Name:
UiAutomator2
Device Name:
Pixel 9
Platform Version:
17
Application:
profile.APP_LOCATION
Step 9: Create an Android Screen
Create an Android Screen object.
This represents a screen in your mobile application and acts as a container for its UI elements.
Step 10: Create Android Elements
Within the Android Screen:
Create an Android Element.
Choose Ui Automator Selector as the locator strategy.
Paste the selector copied from Appium Inspector.
Example:
new UiSelector().resourceId("com.demo:id/login")
Use backticks around the locator.
Step 11: Create a Data Profile
Create a Data Profile to store reusable variables.
Example:
Variable
Value
HUB_URL
https://your-ngrok-url.ngrok-free.dev
APP_LOCATION
/path/to/your/application.apk
The Data Profile keeps environment-specific values separate from the test logic, making maintenance easier.
Step 12: Use the Data Profile
In your Sedstart test:
- Use for the Appium Server.
profile.HUB_URL
- Use for the application path.
profile.APP_LOCATION
This approach avoids hardcoding values and allows the same test to run in different environments with minimal changes.
Step 13: Execute the Test
Run your Sedstart test.
Execution flow:
Sedstart connects to the Appium server using the Ngrok URL.
Appium establishes a session with the Android emulator or device.
The application is launched.
Sedstart interacts with UI elements using the configured UiAutomator selectors.
Assertions are executed, and the results are displayed in Sedstart.
Troubleshooting Tips
Unable to Find an Active Device or Emulator
Ensure the Android version in your capabilities matches the running emulator.
Verify:
adb devices
Appium Server Already Running
If port 4723 is already in use:
appium --port 4725
Update the corresponding Hub URL in Sedstart.
Appium Inspector Cannot Start a Session
Check that:
The Appium server is running.
The emulator or device is running.
The APK path is correct.
The platform version matches the device.
Ngrok Authentication Error
Configure your Ngrok authtoken:
ngrok config add-authtoken YOUR_AUTHTOKEN
Then restart Ngrok.
Ngrok URL Stopped Working Without Any Other Changes
Free Ngrok URLs are ephemeral. If the tunnel was restarted for any reason, generate a fresh URL and update in your Data Profile before re-running the test.
HUB_URL
Best Practices
Use Data Profiles to manage environment-specific values.
Avoid hardcoding Appium URLs or application paths.
Reuse Android Screen objects across multiple test cases.
Prefer UiAutomator Selectors for stable element identification.
Verify the emulator is connected before execution using adb devices.
Keep the Appium server and Ngrok tunnel active throughout the test run.
Conclusion
Sedstart streamlines Android mobile automation by combining its no-code capabilities with the flexibility of Appium. By integrating Appium, Ngrok, and Appium Inspector, you can inspect application elements, configure reusable objects, and execute Android tests efficiently without maintaining complex automation scripts.